OTP programming
How to make the zero position and the settings permanent: when to burn, what ProgramOtp() does, what you do
before and after it, and what a failure means.
Datasheet sections this page relies on
From ams OSRAM DS000637 v1-01:
- OTP burn and verification: Burn and Verification of the OTP Memory; Step-by-Step Procedure (Figure 60), p. 39
All of them, with the driver API for each: Datasheet map.
The settings registers DISABLE, ZPOSM, ZPOSL, SETTINGS1 to SETTINGS3 and ECC (0x0015 to 0x001B) are volatile copies of a
one-time-programmable memory. EnsureInitialized(), ApplyConfig() and the setters write the volatile copy: it works
at once and is lost at the next power cycle. Burning the OTP keeps it for good, and a chip can be burned once.
One attempt per chip
A burn cannot be repeated or undone, and the datasheet requires a part that fails verification to be scrapped. Run the product with the settings in volatile form first, and burn only when every setting is final.
ProgramOtp() is not verified on hardware: it follows the datasheet procedure and is tested step by step on the
register model, which does not model the fuses, the guard band or the ECC algorithm.
When to burn
| Situation | Burn? |
|---|---|
The MCU writes the settings at every start-up (EnsureInitialized() with Config) |
No: nothing is lost at power-off, because the driver writes them again |
| The ABI, UVW or PWM outputs must be right before any MCU talks to the chip | Yes: only the OTP holds settings through power-up |
| The zero position must survive without an MCU (a stand-alone encoder) | Yes |
| Settings may still change, or the magnet may be re-fitted | No |
A burned part starts from its OTP content; initialise it with Config::write_settings = false so the driver reads
the settings instead of overwriting them (Configuration).
Conditions
| Parameter | Value |
|---|---|
| Supply during the burn, 5 V mode | 4.5 V to 5.5 V on VDD, 1 µF on VDD3V3 |
| Supply during the burn, 3.3 V mode | 3.3 V to 3.5 V (narrower than the 3.0 V to 3.6 V operating range) |
| Current | Up to 100 mA during the burn: the supply must deliver it |
| Temperature | 5 °C to 45 °C |
| Port | Implements DelayUs(), as every port must; without it the driver does not compile |
The procedure
The datasheet's "Step-by-Step Procedure to Permanently Program the Non-Volatile Memory" and its flowchart
(Figure 60), and who does each step. ProgramOtp() checks every step and stops at the first that fails;
OtpReport::failed_step names it.
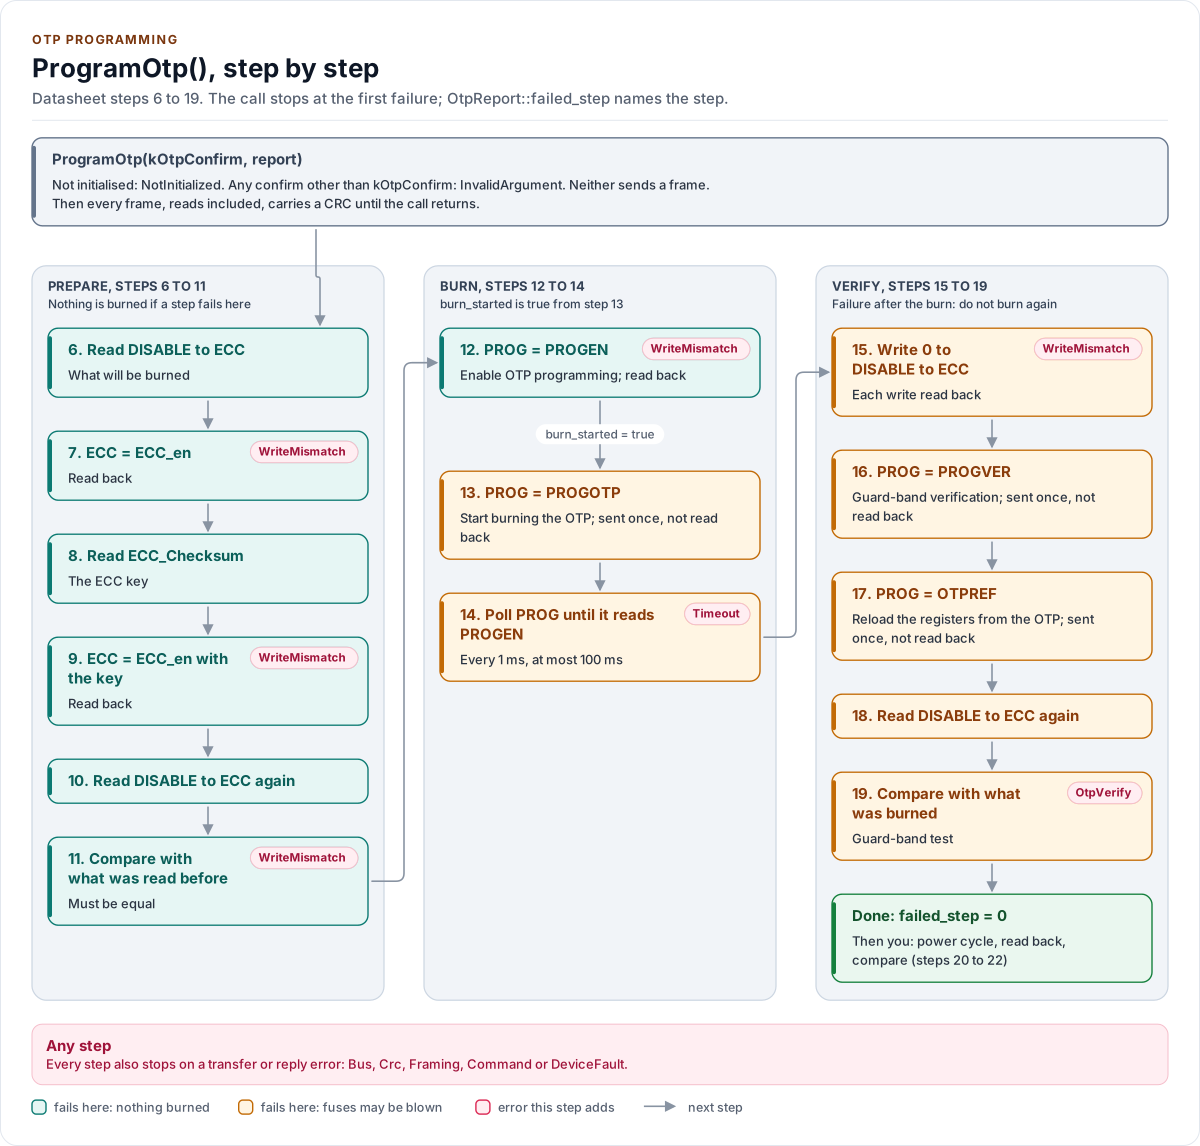
Figure description and sources
The call first refuses to run when the driver is not initialised or the confirm value is wrong, and sends nothing then. It switches every frame to a CRC-protected format and runs three phases, top to bottom and left to right: prepare (steps 6 to 11: read the settings, compute and write the ECC key, read everything back and compare), burn (steps 12 to 14: enable programming, start the burn, poll PROG every millisecond until the burn is done or the timeout passes) and verify (steps 15 to 19: clear the volatile copy, reload it from the OTP at the guard-band level and compare it with what was burned). A pill on a step names the error that step adds; any step also fails on a transfer or reply error. The call stops at the first failure and OtpReport::failed_step names the step. OtpReport::burn_started becomes true just before the step 13 frame is sent, so from there on the fuses may be blown even if the call fails. The steps, registers, timeout and errors are read from otpPrepare(), otpBurn() and otpVerify() in src/as5047u.ipp.
Drawn from: src/as5047u.ipp ProgramOtp; src/as5047u.ipp otpPrepare; src/as5047u.ipp otpBurn; src/as5047u.ipp otpVerify; inc/as5047u_types.hpp kOtpBurnTimeoutMs; inc/as5047u_registers.hpp PROG and ECC; figure module docs/diagrams/figures/otp-flow.py.
| Step | Datasheet | Who |
|---|---|---|
| 1 | Power-on cycle | You, before the call |
| 2, 3 | Write the settings; place the magnet at the zero position | You: EnsureInitialized() or ApplyConfig() with the final Config |
| 4, 5 | Read the angle, write it into ZPOSM and ZPOSL | You: SetZeroHere(), or SetZeroPosition() with a known value |
| 6 | Read DISABLE to ECC | ProgramOtp() |
| 7 to 9 | ECC = ECC_en, read the key from ECC_Checksum (0x3FD0), ECC = ECC_en with the key | ProgramOtp(), each write read back: WriteMismatch at 7 or 9 |
| 10, 11 | Read DISABLE to ECC again and compare | ProgramOtp(): WriteMismatch on a difference |
| 12 | PROG = PROGEN | ProgramOtp(), read back: WriteMismatch on a difference |
| 13 | PROG = PROGOTP: the burn starts | ProgramOtp(): sent once, never retried; burn_started is set |
| 14 | Poll PROG until it reads PROGEN alone | ProgramOtp(): every 1 ms, Timeout after kOtpBurnTimeoutMs (100 ms) |
| 15 | Write 0 into DISABLE to ECC | ProgramOtp(), each write read back: WriteMismatch on a difference |
| 16, 17 | PROG = PROGVER (guard band), PROG = OTPREF (reload from the OTP) | ProgramOtp() |
| 18, 19 | Read DISABLE to ECC and compare with what was burned (guard-band test) | ProgramOtp(): OtpVerify on a difference |
| 20 to 22 | Power-on cycle, read the registers, compare | You, after the call: ReadNonVolatile() against OtpReport::written |
The step text names 0x0016 to 0x001B; Figure 60 reads and clears 0x0015 (DISABLE) too, which is also
non-volatile, so the driver reads, burns and compares all seven registers. Every frame of the procedure, reads
included, is a CRC-protected 24-bit frame (32-bit with Bits32), even when Config::frame is Bits16; the frame
format is restored afterwards. A corrupted read in the compares of steps 11 and 19 would otherwise go unnoticed.
The writes of steps 7, 9, 12 and 15 are always read back, unlike a run-time write without Verify::ReadBack: the
burn cannot be undone and is not timing-critical. The PROG commands of steps 13, 16 and 17 start an action and are
sent once, never read back.
Use it
as5047u::Error BurnSettings(Sensor& sensor) {
  as5047u::OtpReport report{};
  // Irreversible. kOtpConfirm guards against a stray call.
  const auto r = sensor.ProgramOtp(as5047u::kOtpConfirm, report);
  if (!r) {
    std::printf("OTP failed at step %u (burn %s)\n", static_cast<unsigned>(report.failed_step),
                report.burn_started ? "started: do not use the part" : "not started");
  }
  return r.error;
}
kOtpConfirm is the typed confirmation (OtpBurnConfirm) that ProgramOtp() requires as its first argument, so
that a stray call or a corrupted argument cannot burn the part: an integer does not compile, and an OtpBurnConfirm
with any other code returns InvalidArgument and sends nothing.
After the call, cycle the supply (step 20), restart with write_settings = false (Deinitialize(), ApplyConfig()
with that configuration, EnsureInitialized()), then compare
ReadNonVolatile() with OtpReport::written (steps 21 and 22). They must be equal.
When it fails
ProgramOtp() returns the error and fills OtpReport:
| Field | Meaning |
|---|---|
failed_step |
The datasheet step that failed, 6 to 19; 0 when every step succeeded |
burn_started |
True once step 13 was sent: the fuses may be blown, even if a later step failed |
written |
DISABLE to ECC as checked in step 11: what was burned |
| Error | burn_started |
What to do |
|---|---|---|
NotInitialized, InvalidArgument |
false | Nothing was sent: initialise, pass kOtpConfirm |
Bus, Crc, Framing, Command, DeviceFault at steps 6 to 12, or WriteMismatch at steps 7, 9, 11 or 12 |
false | Nothing was burned: fix the cause (Troubleshooting) and call again |
Any error at step 13 or later (WriteMismatch at step 15) |
true | Do not burn again. Cycle the supply and compare ReadNonVolatile() with written. If they differ, scrap the part |
Timeout (step 14) |
true | The burn did not finish in 100 ms: check the supply current and voltage, then as above |
OtpVerify (step 19) |
true | The part failed the guard-band test: scrap it, as the datasheet requires |
Safety notes
- Burn on the bench or in an end-of-line station, never from a code path that runs in the field. Keep the call out of the normal firmware image if you can.
- Check the supply and temperature limits above before the call; the driver cannot measure them.
- Do not cut power during the burn (steps 13 and 14).
ProgramOtp()burns what the volatile registers hold at step 6. Read them withReadNonVolatile()first if anything else may have written them.
Next: Configuration lists every setting the burn makes permanent.